The Injection Molding Procedure & Modern Cavity Prep: In Enamel We Trust

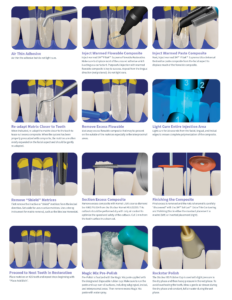
- The Infinity Edge Tooth Restoration Interface or TRI. Out with the Old Concept of Flashing: Studies have shown that Class II composites don’t work well with the notion of a clean margin. With hand manipulation, you will either be short or long of the margin about 70% of the time 2. The problem is, in a traditional prep and filling method, the surplus is an ‘accident”; uncontrolled, unpolymerized, composite floating on a sea of biofilm blood and trapped soft tissue. In with the New: The Infinity Edge. After anesthesia and rubber dam placement, Bioclear Dual Color Disclosing solution is applied to the entire tooth and the Bioclear blaster was used to remove biofilm. This reduces stain and allows a much better bond on the infinity edge. The infinity edge blends and camouflages the margins of the composite. With the Bioclear Method the Infinity Edge TRI is the restoration’s greatest asset.
- Pre-wedging: This step provides multiple benefits to the operator. Out with the Old: Traditional wedges fight the papilla and often the wedge or the tissue is sitting inside the cavity prep leading to both a void in the material at the margin and concave emergence profile. With pre-wedging and the Diamond Wedge, the wedge works with instead of against the papilla and aggressively separates the tissue from the tooth, forming a small trench for the Biofit Matrix to slide into.
- Cavity preparation: The Venn Diagram in figure 6 demonstrates the importance of aligning all the components of the Modern Class II. Cutting a modern cavity preparation is one of the 4 co-dependent features of the Modern Class II. Out with the Old: Classic GV Black Preps (still taught at most dental schools) and slot preps are essentially amalgam preps. These boxy preps with definitive margins the inverse of what we need to create leak-proof restorations. In with the New: The pre-wedge is removed, and the interproximal area is sanded with the Lightning® Strip. The cavity preparation area was then re-blasted to clean 360 degrees around the tooth and the clear Biofit matrix is placed.
- Management of the matrix to optimize the contact area: Out with the Old…Burnishing. Simply expand and appose the Biofit matrix with the micro-pliers in the Biofit kit or traditional cotton pliers.
- Etch, rinse and dry: Out with the old. Use of a dental operating microscope (Global Surgical) (Fig 7) has taught us that selective etching of just the enamel is logistically improbable and practically impossible. Self-etching alone isn’t smart because rinse etching (etching with 37% phosphoric acid) is still the gold standard, and incredibly important in these new enamel driven preparations. Using a total etch technique, the etch was left on the enamel for about 20 seconds and on the dentin for 10 seconds, after wards rinse and dry.
- Apply bond correctly to the dentin. I use 3M™ Scotchbond™ Universal Adhesive because it allows for one-step, one coat application. For buildups where the enamel is gone, I can use it as a straight-up self-etching adhesive and skip the rinse-etch step. The adhesive was massaged into the dentin for a full 20 seconds, lightly air dried and then light cured. Most clinicians are not giving this critical step enough time.
- Injection molding: The adhesive was reapplied as a wetting agent, then air dried – do not light cure. A small amount of 3M™ Filtek™ Bulk Fill Flowable Restorative was then injected into the adhesive film acting as a surfactant and all along the edges, and again, do not light cure. Filtek One Bulk Fill Restorative was then injected so that the material marries the flowable and together fills in all the nooks and crannies. The Filtek One Bulk Fill material makes up at least 90% of the restoration, which creates a strong and smooth restoration, and the lesser resins (adhesive and flowable) are displaced out the top.
- Cure, then Sculpt: Three-point curing from occlusal, buccal, and lingual is crucial for achieving true 5 mm depth of cure in the interproximal. This new curing protocol for bulk fills, that of 3-point curing, is aided significantly using a clear matrix to allow lateral light transmission. The composite in the injection zone was then rapidly sculpted with the 3M™ Sof-Lex™ XT course disc, a centerpiece tool in the Bioclear method, and my go-to disc.
- 2 Step Polish: Bioclear Magic Mix dual coarseness is applied for the satin finish then followed with a diamond impregnated high shine cup. (Jazz Polisher SS White) The resultant brilliant shine is revered as the “Rock Star Polish”.
- Evaluate: The final step is to evaluate the occlusion. Remember that the composite will absorb water and “grow”, so leave the occlusion a little light. The result of this procedure is a natural looking and esthetically pleasing composite resin restoration.
Case Study: Deep margin Acquisition, Selective Caries Removal, Cuspal overlay with Infinity Edge Tooth Restoration Interface (TRI)
In figures 8 through 18 the modern Clark Class II procedure is demonstrated. We are currently doing a retrospective study on these non-retentive cavity preparations and will show a very high survival rate.
[post-callout]
What about Bioactive materials? Are they the next big thing?
I was at the pet store the other day and spied the new doggie treats that are emblazoned with the “Bioactive” advantage on the packaging. Is this Bioactive thing a fad or is it the future? Well here is what we do know: Many of the failures of composite come from structural and design flaws of the prep and the filling method resulting in toth fracturing and poor contacts that lead to periodontal inflammation, food impaction, recurrent decay. To quote my partner Dr. Jihyon Kim at the Bioclear Learning Center, “A Class II restoration is treatment of disease specific to the contact area. Shouldn’t an ideal contact be job one?” And yet nearly all Class II restorations have less than ideal contacts. To make things worse, the contact is too far to the occlusal, leading to sharp marginal ridges that are prone to fracturing. The cavity prep taught in nearly every dental school minimizes enamel rod engagement and maximizes dentin tubule involvement. Many have wide open margins. These preps are designed for amalgam, and when filled with composite they are, essentially, engineered to fail. Can Bioactives placed in traditional manner bail out a cavity prep from 1890 with butt joints leading to open margins, high C-Factor, and stress risers leading to tooth fracturing? That would be nice. But let’s not hold our breath. For most preparations we can maximize enamel rod integration with infinity edge margins and create TRI’s that are incredibly robust. Bioactivity could be a nice bonus, some day. Maybe. But on Monday Morning I need something I know will work. Good engineering and modern methods are a surer bet.
References:
1) Does Incremental Filling Technique Reduce Polymerization Shrinkage Stresses?
Versluis A, et.al., J Dent Res March 1996; 75(3): 871-878
2) A radiographic and scanning electron microscopic study of approximal margins of Class II resin composite restorations placed in vivo. Opdam NJ, Roeters FJ, Feilzer AJ, Smale I.
J Dent. 1998 May;26(4):319-27.