Mild to Wild by Dr. David Clark and Dr. Charles Regalado
Abstract: Patient interest in treatment of open gingival embrasures, or more commonly described as black triangles, has been steadily increasing over the past fifteen years. Adult orthodontics, changing patient expectations, and social media are some of the many drivers of this movement towards elimination of unfamiliar negative space. This article presents two case studies with three and four-year outcomes demonstrating the durability and precise fit of the Bioclear Method featuring injection molded heated composite. The Bioclear Black Triangle kit and original Bioclear Diastema Closure matrices that are specifically designed with exaggerated emergence profile are explained. Restoratively driven papilla regeneration shows real promise to treat this functional and esthetic dilemma.
Treatment of Black Triangles has recently reached a significant threshold of consciousness for both patients and clinicians. Additionally, most orthodontists have begun to acknowledge that post-operative black triangles that appear after adult orthodontics is a real concern.
Prevalence and Patient Attitudes
One third of adults suffer from black triangles, or more appropriately referred to as open gingival embrasures.1 Besides being unsightly and prematurely aging the smile, black triangles are prone to accumulate food debris and excessive plaque.2,3 Black Triangle occurrence after adult orthodontics is very common, and upsetting enough to the patients that some orthodontists are gun-shy to treat adult crowding cases or adults in general.4-8 Age of the patient, duration of active treatment, crown morphology, and degree of crowding are involved in black triangle manifestation and can readily be predicted before orthodontics is initiated.9-14 In a landmark study, Dr. Joanne Cunliffe analyzed patient concerns and showed that patients are more concerned about black triangles than they are about dark teeth or crowded teeth, which is surprising to many esthetic-minded clinicians that prescribe whitening and adult orthodontics.15 A quick internet search of dental black triangles will lead the reader to a seemingly never ending trail of patient questions, patient complaints, and now even lawsuits resultant from adult orthodontic cases and post-periodontal therapy papilla loss. Instead of sweeping these problems under the rug, this clinical and esthetic dilemma is a unique opportunity for us as cosmetic dentists to improve the functionality, confidence, health, and esthetics of these patients’ oral condition.
In this article we will present two case reports. First, a life-changing, fairly extreme black triangle treatment is shared. This case was treated with the original anterior Bioclear matrix system. Second, a single, simple black triangle treatment is presented. In the second case the newer BT system was utilized. Both of these treatments utilize a recipe-based method which includes injection over-molding of the teeth utilizing special patented matrices, gauges, heated composite, and to remove both biofilm and the protein pellicle and simplified polishing to achieve a super-glossy finish.
Case #1: Extreme Black Triangle Treatment
Patients are often at a crossroads when it comes to their desire for a better smile. When options are financially beyond their ability, the dentist must seek a result that can provide a satisfactory solution while maintaining or even improving existing health conditions.
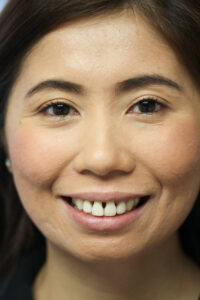
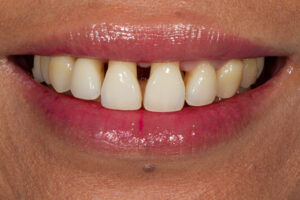
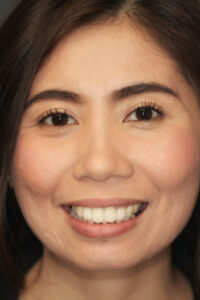
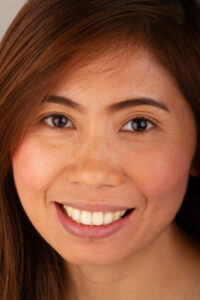
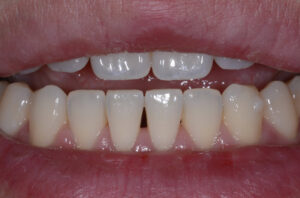
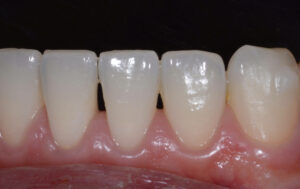
This 38-year-old female presented with severe bone and tissue loss with resultant extreme black triangles between several teeth. Most important to her was her upper smile. She was referred by her periodontist, who confirmed that the patient had excellent compliance over a course of prescribed treatment that included full mouth Scaling and Root Planing, LANAP, and had maintained consistent periodontal maintenance appointments at 3-month intervals. Inflammation was under control, and despite the severe loss of the periodontium, she had relatively low mobility with nothing beyond a 1 or 1+ designation. Her motivation was high, and she was eager to proceed with having her black triangles closed. The extreme amount of unfamiliar negative space (black triangles) presents a challenge both to the patient who must endure the emotional impact this creates and to the dentist who must treat the case. (Figures 1-4)
OPTIONS
Patients presenting with a severe degree of bone and tissue loss have been treated with invasive procedures, including extractions, block grafts, and implants.16 Often, a prosthesis utilizing pink porcelain is needed to hide the remaining negative space.17 If implants are not affordable or not deemed predictable, then extractions and removable prosthetics can be considered. Alternatively, full crowns are often recommended. Each of these options carries its own risk to reward, and the cost of treatment extends over a wide range and, in many cases, is out of reach financially for many of our patients.
This is an excellent case, in principle, for the Bioclear Matrix System and method. In principle, because with such large negative spaces to be closed, there are concerns about how that will affect tooth size and shape, and final proportions.18 These issues must be relayed to the patient to avoid an embarrassment to the doctor and a disappointed patient.
Two questions arise: Can the spaces be closed, and should all the spaces be closed? The former could result in unacceptable tooth proportions, and the latter may miss the mark from the patient’s perspective and desired outcome. However, in the clinician’s experience, most patients more often take the option resulting in the least invasive procedure and find the results more than satisfactory. The perception of a beautiful smile is what matters most, even when there are some compromises that must be made.19
After consulting with the patient, she chose to proceed with Bioclear Black Triangle restorations and to have as much space closed as possible since her condition was a major obstacle and had a negative impact on her public interactions. Her goal was a confident and pleasing smile, untethered to the often-used norms in dentistry used to evaluate “ideal” smiles.20
TREATMENT
The proper shade was chosen to match her existing color at the beginning of the appointment, followed by matrix selection.
The key to correct matrix selection is to do a simple try-in of the various sizes of Bioclear matrices prior to placement of the rubber dam. A rubber dam is highly recommended to achieve total isolation and to expose more tooth structure below the visible gingival margin. The goals in matrix selection are to preview that the black triangle will indeed be closed adequately and to have no hindrances to being able to seat the matrices completely into the sulcus of each tooth. If this step is done after the rubber dam is placed, the dam compresses the tissue apically, and false information about the actual space needed to close would result in a selection of too large a matrix and excess lateral pressure to the papilla after injection molding. Excess pressure can distort the shape of the papilla that will be formed with this procedure. The correct matrix size and shape will allow just enough composite to close the black triangle and apply side pressure to support the papilla, enhancing long-term results. (Figures 5-6)
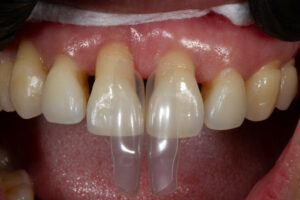
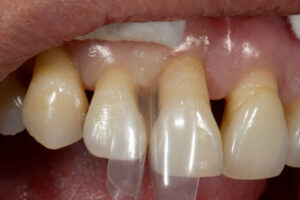
The Bioclear® DC-201 matrix was chosen as ideal to close the spaces between the central incisors and for the distal surfaces of the centrals as well. The smaller DC-203 matrix was used for the mesial and distal surfaces of the lateral incisors.
All matrices were then set aside into designated and marked containers.
(This case was done using classic Bioclear Matrices. At the time of the procedure, the Black Triangle Matrix Kit was not yet developed.)
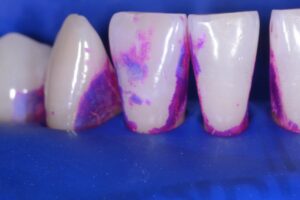
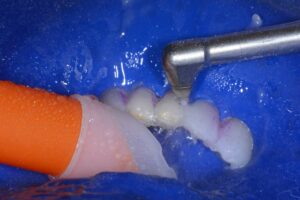
The rubber dam was then placed over the anterior segment, and after properly tucking the dam into the sulci, the teeth were dried, disclosed with Bioclear® Disclosing Solution, and rinsed after 30 seconds. Teeth 7-10 were then cleared of all biofilm and protein pellicle with the use of the Bioclear Blaster® using aluminum tri-hydroxide powder under a high-pressure water spray.
Prior to placing the matrices, interproximal contacts were entered with the Tru-Contact® serrated handheld strip and then lightly sanded with Tru-Contact® diamond sanders. This allows further removal of biofilm in these tight areas and allows complete seating of the matrices as contact tightness is reduced. The final amount of black triangle closure can be visualized by placing the matrices before rubber dam is applied. The dentist is able to assess whether the matrices are correct to close the space. If not, the matrix can be either customized or replaced with another that might improve the outcome.
Tooth #8 was chosen to be injection-molded first. The designated matrices for the mesial and distal were placed and seated into the sulcus. This forms a full 360º envelope or “aquarium” around the tooth. The matrices chosen for the mesial of #9 and the mesial of #7 were placed on their respective surfaces to act as “shield” matrices. These “shields” guard against over encroachment of composite into the interproximal space during the injection-molding process, eliminating accidental curing of composite beyond the desired shape as given by the matrix.
Then, 37% Phosphoric acid was used to etch the entire tooth #8, rinsed after 15 seconds, and excess water was removed. 3M® Scotchbond Universal Adhesive was scrubbed into exposed dentin areas for 20 seconds, and air thinned. Then the entire tooth was copiously wetted with more adhesive to act as a surfactant for the composite as it is injection-molded. No pre-curing was done to the adhesive.
Warmed 3M® Filtek Supreme Flowable Restorative was slowly injected into the matrices around tooth #8 by placing the tip of the syringe into one interproximal area on the facial side, allowing the composite to flow slowly to the lingual half of the tooth. The same process was repeated to the other interproximal area. The lingual half of the tooth was then filled to completion. Great care is taken to ensure that void-free flowable composite has filled much of the matrix system prior to adding the paste composite. Heated 3M® Filtek Supreme Ultra Universal paste composite was then injection-molded into the matrix system. The heated paste composite displaces excess adhesive as well as much of the flowable composite leaving a dense monolithic mass composed chiefly of the paste composite. After cleaning up excess with the Bioclear Paddle Instrument and dry brushes along the gingival areas, the composite was light-cured on both facial and lingual surfaces for a minimum of 20 seconds per side.
Using a Komet® coarse diamond flame-shaped bur and 3M® Soflex Coarse discs, the cured composite was shaped to roughly 80% of the final desired tooth contours. Once this is achieved, the same process was done to tooth #9 and subsequently to the lateral incisors.
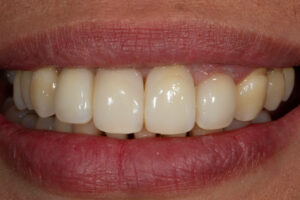
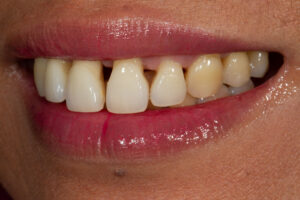
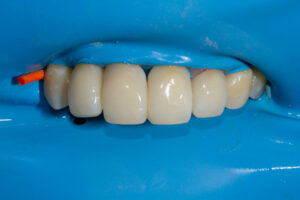
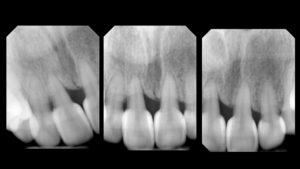
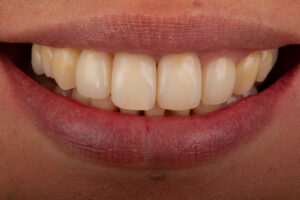
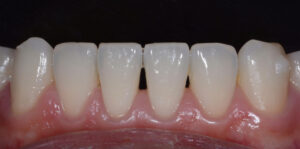
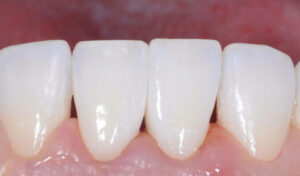
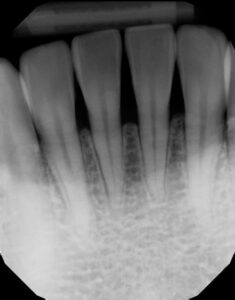
Final shaping was completed with the 3M® Soflex Coarse disc, followed by a final polish using Bioclear Magic Mix pre-polishing paste and the Bioclear Rockstar Polishing cup. (Figure 7) Rubber dam was removed, and the smile was evaluated for facial harmony. Adjustments were not needed for this patient as she was pleased with all aspects of her smile. (Figures 8-9) Post operative radiographs were taken to assess for excess composite and quality of technique and can be compared to the pre-operative x-rays. Post operative radiographs are useful for quality control. Notice how a smooth “infinity edge” can be created with the Bioclear matrices and technique. This is essential for a healthy tissue response. (Figures 10-11).
Final Result: While there was great concern over the effect of the added volume of composite and how it may negatively affect the tooth contours and thus the overall smile, it is shown that the results were highly acceptable. The patient was more than happy and was pleased that she opted for Bioclear to solve her dilemma. With wide variations of perceived beauty in a smile, this is not surprising.20, 21
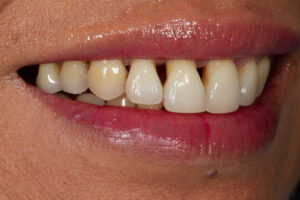
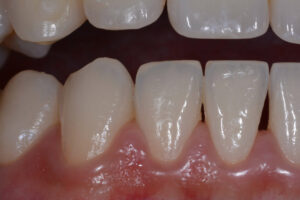
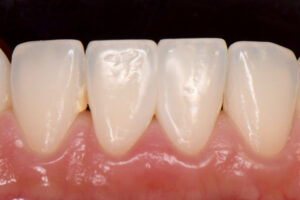
 One of the greatest benefits of using Bioclear in closing black triangles is the added stability that periodontally weak teeth can obtain. In this case, stability was improved further at the two-year mark. (Figures 12-13) The 4-year results are proving to be color stable and free of inflammation (not shown). As often seen following cosmetic dentistry, the improvements are dramatic and result in a more relaxed and confident smile.
Case #2: A Single Black Triangle Treatment
This 34-year-old male contacted the Bioclear Clinic in Tacoma WA USA after doing an internet search on treatment of black triangles. Like many adult patients who complete orthodontics, he had black triangles that appeared during adult orthodontic treatment. (Figures 14-15) The patient received a complete examination including necessary radiographs and photographs. Although the patient had five black triangles present, he elected to just have the larger midline area single black triangle treated. The patient received a full explanation regarding the limitations of treating just the single area in lieu of a more comprehensive treatment.
Proper photographs from a lateral view are critical in these cases because a frontal view which is what the patient sees, is different from lateral views which is what everyone else sees. (Figures 16-17) In the author’s significant experience treating these types of cases, it is rare to treat a single black triangle. This case will therefore provide a rare and enlightening contrast of treated versus untreated areas when we view the two-year follow-up.
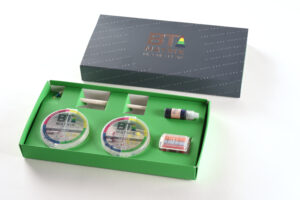
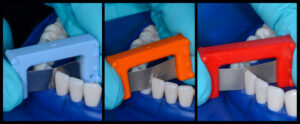
The Bioclear (Tacoma WA USA) BT kit used in case one is shown in Figure 18 with the four important components: small and large BT matrices in four different and color-coded emergence profiles, dual color disclosing solution, the black triangle sizing gauge, and the TruContact sanders. Additional materials and instruments are explained in the body of the article.
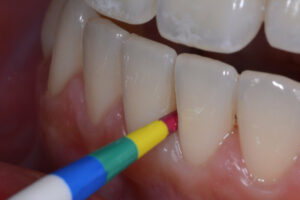
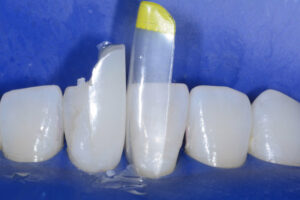
First, the Black Triangle gauge is inserted buccal-lingually below the contact to assess the mesio-distal size of the black triangle. (Fig 19) The gauge will bind at one of the four colors. In this case the gauge binds in the pink zone Then a pair of correspondingly color-coded Black Triangle matrices are tried in for each embrasure. Before the rubber dam is placed, the TruContact sanders are used to groom the contact area to remove calculus and to lighten the tension of the contact areas to allow the matrices to seat fully. (Fig 20) Once the rubber dam is placed, the teeth are disclosed (Fig 21) and then blasted with an air/water/abrasive slurry of aluminum try-hydroxide (Fig 22) (Bioclear Blaster). The 37% phosphoric acid used to condition the teeth does not remove the soft, sticky biofilm that covers the tooth. It is therefore imperative that the teeth be aggressively cleansed before acid-etching.
Additionally we now understand that the protein pellicle that coats the tooth must be removed to achieve an ideal bond. The interproximal area is extremely difficult to access with scalers and prophy cups and is of course the exact area that we are attempting to bond to when treating black triangles. In general, the BT gauge will match the profile of the corresponding matrices, but in this case the more aggressive emergence profile matrix, or yellow BT matrices are chosen because of the unique shape of the teeth even though the gauge suggested the pink color. (Fig 23)
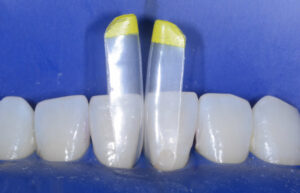
The first tooth is injection molded with a 3-step process. First an adhesive such as Scotchbond Universal Plus is placed on the previously etched enamel, it is air-thinned but not light cured.
Next, warmed flowable composite is carefully injected using the uncured adhesive as a wetting agent, or surfactant, to minimize air entrapment and maximize flow into the acute matrix-tooth interface. The flowable composite is injected from both the facial and lingual directions. The flowable is not light-cured yet. Finally, warmed paste composite, in this case Filtek Supreme Ultra shade B-1B is injected from the facial direction. The paste easily displaces the flowable composite to the lingual and incisal vent areas. The goal is that the final percentage of paste composite versus the flowable composite is 90% /10%.
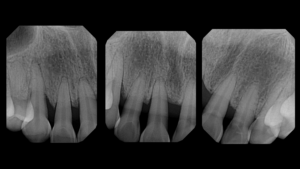
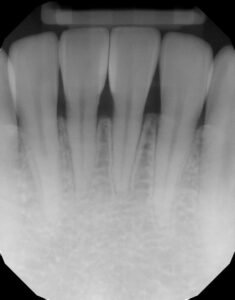
The matrix is removed from tooth #25, (Fig 24) and then #24 is injection molded. This to ensure a snug contact. The teeth are then rapidly sculpted together for sake of symmetry and efficiency. The final step is the Rock Star Polish. Invisible infinity edge margins are placed at mid-tooth. (Figs 25, 26) At one-year recall, the treated area is essentially bacteria and calculus-free, and the neighboring untreated embrasure is filled with calculus. The obvious health and quality of life of the treatment are a bonus to the esthetic benefits. (Fig 27) Pre- and post-operative radiographs demonstrate the imperceptible interface of composite to tooth and the void -free quality of the composite which is the goal if injection over-molded heated monolithic composite. (Figs 28, 29)

Summary: Traditional hand-spackled composite placement for treatment of Black Triangles has historically been viewed with skepticism by many restorative dentists, orthodontists, and periodontists. Until now, our confidence as clinicians to treat “Black Triangle Disease” is so guarded that most patients are told that there is no healthy option.
Patients are often told that either nothing should be done or are offered aggressive and physiologically costly procedures such as crowns, veneers, physiologically inappropriate interproximal reduction (IPR) during or at the end of orthodontic treatment. Surgeries and dermal fillers are rarely a predictable, long-term solution. The problem should not be underestimated as one third of adults suffer the esthetic and functional dilemmas associated with “Black Triangle Disease.3
References
-
- Kurth J, Kokich V. Open gingival embrasures after orthodontic treatment in adults: prevalence and etiology. Am J Orthod Dentofacial Orthop 2001; 120:116-123
- Ko-Komura N, Kimura-Hayasi M et al. Some factors associated with open embrasures following orthodontic treatment. Aust Orthod J 2003; 19:19-24
- Joshi K, Baiju CS, Khashu H, Bansal S, Maheswari IB. Clinical assessment of interdental papilla competency parameters in the esthetic zone. J Esthet Restor Dent. 2017 Jul 8;29(4):270-275. doi: 10.1111/jerd.12307. Epub 2017 May 25. PMID: 28544578.
- An SS, Choi YJ, Kim JY, Chung CJ, Kim KH. Risk factors associated with open gingival embrasures after orthodontic treatment. Angle Orthod. 2018 May;88(3):267-274. doi: 10.2319/061917-399.12. Epub 2018 Jan 16. PMID: 29337634; PMCID: PMC8288320.
- Meeran NA. Iatrogenic possibilities of orthodontic treatment and modalities of prevention. J Orthod Sci. 2013 Jul;2(3):73-86. doi: 10.4103/2278-0203.119678. PMID: 24987646; PMCID: PMC4072383.
- Tanaka OM, Furquim BD, Pascotto RC, Ribeiro GL, Bósio JA, Maruo H. The dilemma of the open gingival embrasure between maxillary central incisors. J Contemp Dent Pract. 2008 Sep 1;9(6):92-8. PMID: 18784864.
- Burke S, Burch JG, Tetz JA. Incidence and size of pretreatment overlap and posttreatment gingival embrasure space between maxillary central incisors. Am J Orthod Dentofacial Orthop. 1994 May;105(5):506-11. doi: 10.1016/S0889-5406(94)70013-3. PMID: 8166102.
- Kandasamy S, Goonewardene M, Tennant M. Changes in interdental papillae heights following alignment of anterior teeth. Aust Orthod J. 2007 May;23(1):16-23. PMID: 17679530.
- Kolte AP, Kolte RA, Bawankar P. Proximal contact areas of maxillary anterior teeth and their influence on interdental papilla. Saudi Dent J. 2018 Oct;30(4):324-329. doi: 10.1016/j.sdentj.2018.05.007. Epub 2018 May 28. PMID: 30202169; PMCID: PMC6128317.
- Sharma AA, Park JH. Esthetic considerations in interdental papilla: remediation and regeneration. J Esthet Restor Dent. 2010 Feb;22(1):18-28. doi: 10.1111/j.1708-8240.2009.00307.x. PMID: 20136942.
- Saxena D, Kapoor A, Malhotra R, Grover V. Embrasure morphology and central papilla recession. J Indian Soc Periodontol. 2014 Mar;18(2):194-9. doi: 10.4103/0972-124X.131323. PMID: 24872628; PMCID: PMC4033886.
- Montevecchi M, Checchi V, Piana L, Checchi L. Variables Affecting the Gingival Embrasure Space in Aesthetically Important Regions: Differences between Central and Lateral Papillae. Open Dent J. 2011;5:126-35. doi: 10.2174/1874210601105010126. Epub 2011 Jul 29. PMID: 21892365; PMCID: PMC3162192.
- Rashid ZJ, Gul SS, Shaikh MS, Abdulkareem AA, Zafar MS. Incidence of Gingival Black Triangles following Treatment with Fixed Orthodontic Appliance: A Systematic Review. Healthcare (Basel). 2022 Jul 24;10(8):1373. doi: 10.3390/healthcare10081373. PMID: 35893195; PMCID: PMC9331869.
- Roccuzzo M, Roccuzzo A, Ramanuskaite A. Papilla height in relation to the distance between bone crest and interproximal contact point at single-tooth implants: A systematic review. Clin Oral Implants Res. 2018 Mar;29 Suppl 15:50-61. doi: 10.1111/clr.13116. PMID: 29498124.
- Cunliffe J, Pretty I. Patients ranking of interdental “black triangles” against other common esthetic problems. Europ J Pros Rest Dent. 12?2009; 17(4):177-181
- Pieri F, Aldini NN, Marchetti C, Corinaldesi G. Esthetic outcome and tissue stability of maxillary anterior single-tooth implants following reconstruction with mandibular block grafts: a 5-year prospective study. Int J Oral Maxillofac Implants. 2013 Jan-Feb;28(1):270-80. doi: 10.11607/jomi.2560. PMID: 23377074.
- Interdental Papillae: A Case Report. Compend Contin Educ Dent. 2017 Jul;38(7):474-480. PMID: 28727466.
- Al Taki A, Hamdan AM, Mustafa Z, Hassan M, Abu-Alhuda S. Smile esthetics: Impact of variations in the vertical and horizontal dimensions of the maxillary lateral incisors. Eur J Dent. 2017 Oct-Dec;11(4):514-520. doi: 10.4103/ejd.ejd_351_16. PMID: 29279680; PMCID: PMC5727739.
- Boglarka O. Kovacs, Shamir B. Mehta, Subir Banerji and Brian J. Millar. Aesthetic Smile Evaluation-A Non-Invasive Solution. Dental Update 2011, 38:452-458
- Vincent O. Kokich, Vincent G. Kokich, and H. Asuman Kiyak. Perceptions of dental professionals and laypersons to altered dental esthetic: Asymmetric and symmetric situations. American Journal of Orthodontics and Dentofacial Orthopedics. Volume 130, Number 2 :141-151
- Siahpush M, Spittal M, Singh GK. Happiness and life satisfaction prospectively predict self-rated health, physical health, and the presence of limiting, long-term health conditions. Am J Health Promot 2008;23:18-26
- Chan MYS, Mehta SB, Banerji S. An evaluation of the influence of teeth and the labial soft tissues on the perceived aesthetics of a smile. Br Dent J. 2017 Aug 25;223(4):272-278. doi: 10.1038/sj.bdj.2017.713. PMID: 28840875.